ME360 Exercise 4:
4-Bar Tutorial

Design Goals:
CAD a model of a four-bar linkage and simulate its movement with a motor in Solidworks. With this motion simulation, analyze the mechanical system.
Learning Objectives:
- Become familiar with Solidworks mating functions.
- Be able to efficiently use Solidworks Motion Study.
- Use this Motion Studies to gain quantitative data.
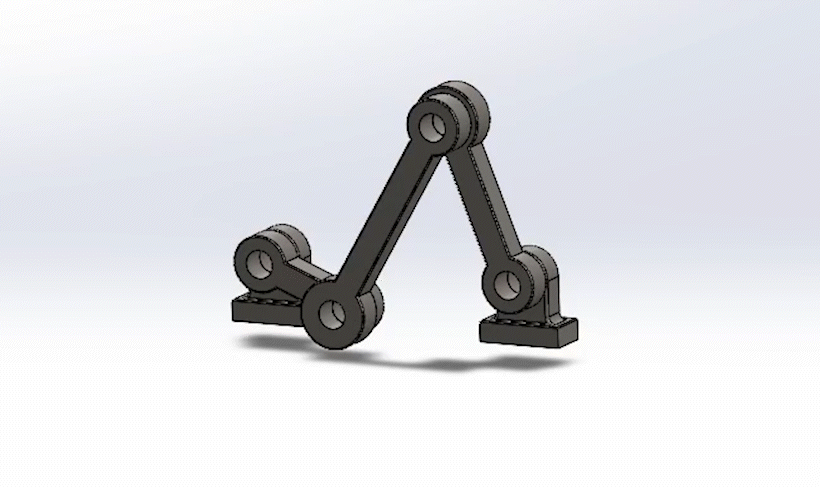
Assembly:
This four-bar mechanism is made of different components. From left to right:
Bearing, Crank, Extension, Rocker.
Shown below is a picture of the full assembly. In the assembly there are two bearings, both fixed in place; combined they make a psuedo "fourth bar."


From left to right in this assembly, Bearing, Crank, Extension, Rocker, Bearing.
Motion Study:
The next part of this project was setting up the motion study, and performing simulations for data. A motor was assigned to turn the crank. In this case, it was set to 20RPM. With the bearings fixed, the each component should move in a unique way. The crank moves in circles, the rocker oscillates, and the extension experiences complex motion. Below is a .gif of the four-bar mechanism in motion.
With this mechanism set to a motor, we can analyze a multitude of things including the trace path of any point, or measure the torque output of the motor.
The material of each component is Plain Carbon Steel, and with the 20RPM motor set to the crank, there is also simulated gravity acting downwards.
Analysis / Deliverables:
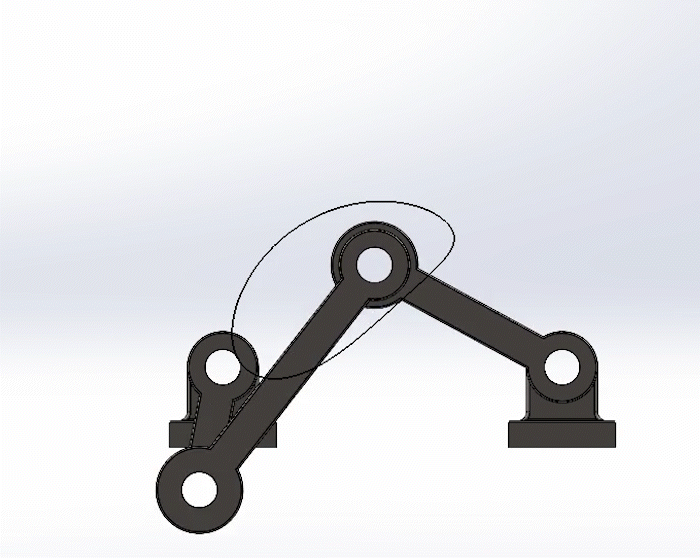
Trace Path
To trace the path of the midpoint of the "extension," we can create a plot an select Displacement > Trace Path. This creates a .csv of the (x,y,z) coordinates of the point we've selected. In this case that point is the midpoint, on the front face, of the "extension." Also note that because this mechanism is planar, the z-coordinate of the trace path is constant. This is reflected in the .csv given by Solidworks.
Below is an Excel graph of the X and Y positions, showing the trace path of the midpoint.

Part A: Maximum Value of the Motor Torque
We can find the maximum value of the motor torque by setting a plot to give us Torque. In Solidworks, create a plot in the motion study - Forces > Motor Torque > Magnitude. Then select the Motor as the component to analyze. Running the study produced the graph shown below.
The maximum torque shown on the graph is 6 lbf-in.

Part B: Angle of the Crank at Maximum Motor Torque
In Solidworks, create another plot in the motion study - Displacement > Angular Displacement > Magnitude. Then select the Motor as the component to analyze. Running this new study produced the graphs shown below.
Solidworks allows you to overlay graphs over existing graphs, shown below with red and blue lines.
From these graphs we can see that when the motor torque is at its maximum, the angle is about 160°.


Part C: Vertical Reaction Force Acting on the Bearings
Create another plot in the motion study - Forces > Reaction Forces > Y Component. Instead of selecting the motor to analyze, we want the reaction force seen on the bearings. Select the Hinge Mate between the left bearing (called "Bearing") and the crank. Running the study should produce a graph, shown below.
The veritcal reaction force on Bearing is about 2.9 lbf.

Performing the exact same steps, but for the bearing on the right (called "NewBearing"), will produce the graph shown below titled "NewBearing Reaction", ensuring that the Hinge Mate between NewBearing and Rocker is now the reaction being evaluted.
The veritcal reaction force on NewBearing is about 2.2 lbf.

Part D: Minimum Motor Power for Constant 600RPM
The steps are similar, create a plot - Momentum/Energy/Power > Power Consumption > Magnitude. Select the Motor as the component to analyze. Running the study should produce the graph shown below.
Shown by the graph the minimum power consumption to run this motor at a constant 600RPM is about 440 Watts.

Part E: Negative Torque
Torque in general, is mathematically defined as τ = r X F, where r and F are both vectors. If either one of these values were to be negative, it would mean the vector is pointing in the opposite direction. This would cause the cross product to be in the opposite direction.
A negative torque, put simply, would mean the direction of the spin would be flipped.
If a positive torque corresponds to clockwise rotation, a negative torque would correspond to a counter-clockwise rotation, and vice versa.
Relating this to mechanisms and mechanical links, a negative torque would mean the crank would have to rotate in the opposite direction.
Positive Torque

Negative Torque
Shown to the left is the crank in the positive direction, in this case, counter-clockwise. But shown to the right to the is the crank in the negative direction, clockwise.
Note the trace paths are exactly the same, and the movement of the links are similar, just in a reverse sequence.