ME360 ASSIGNMENT 4 -
Mechanism Design

Design Goals:
Design and model a mechanism for a trashcan that moves a flat tray of trash from the top and pivots to throw away the trash in the back.
Constraints:
- Trash must not fall before it reaches the back of the bin
- The pivot points of the mechanism must be on the trashcan
- The tray must not touch the trashcan
Design:

Fig. 1. Given trashcan constraints. The tray (in blue) should not enter the red zone.
2D CAD (Math Illustrations):
The first step of creating a simple 4-bar mechanism as seen on this trashcan should be to imagine it in two dimensions. Because this mechanism is planar (only moves in two DOF, X and Y) it can be modeled in 2 Dimensions. Mechanisms like this are derived from pure geometry, and the program Math Illustrations is great for 2D designs like this.
The first step to building this mechanism is to establish our start and end positions, and an intermediate position. In this case they are labeled J-K, J'-K', and J''-K''. To find a way to get from J to J' to J'' in one swift motion, we can have to find a radius that meets all three points. We do this be creating a bisector between any two points, then creating another bisector between two other points. The point at which these bisectors intersect is our radius that hits all three points (J, J', and J'') in one movement of fixed length.
These steps should be performed for K, K', and K'' to produce the same effect.
Note: the red/blue overlay seen in the Math Illustrations images (Fig. 2 - 8) is a true-to-dimension sketch of the constraints seen in Fig. 2. This was quickly created in Adobe Illustrator because the Fig.1's measurements were not true to their written dimension.
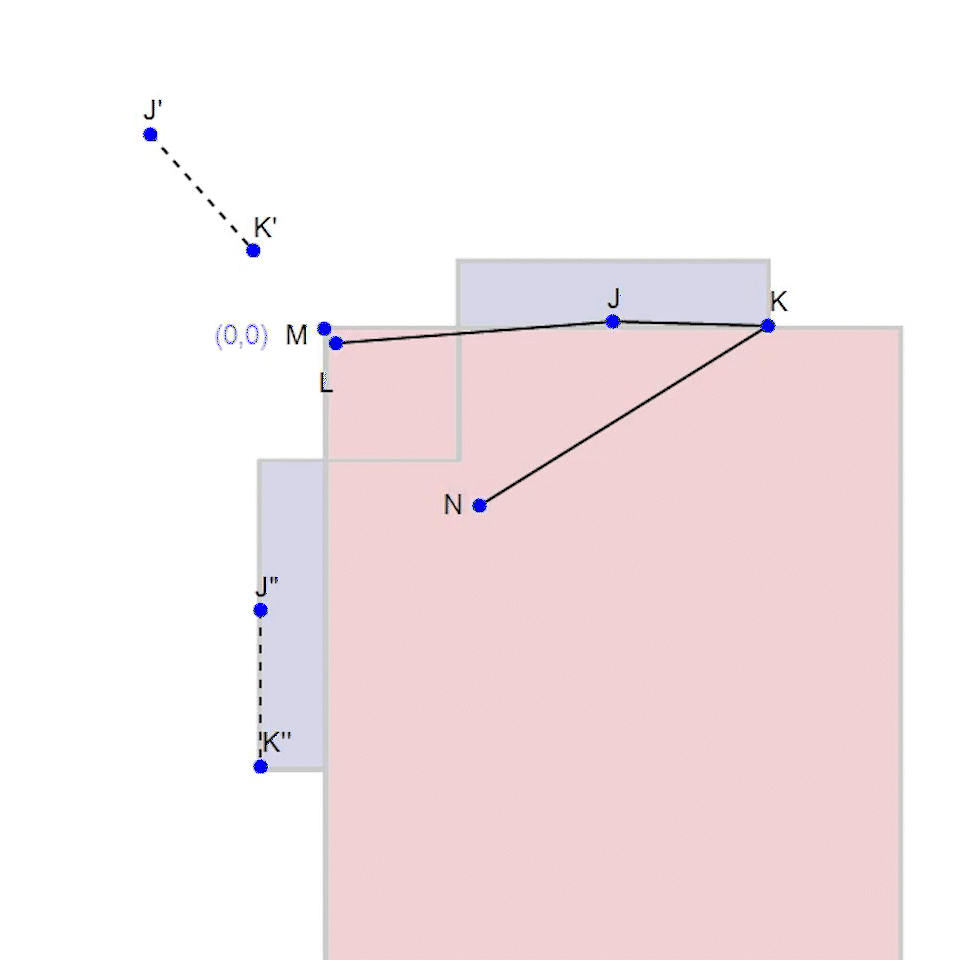
Fig. 2. Full working mechanism. Point M is set to (0,0) as reference.

Fig. 3. The dotted lines are bisectors between J'' - J' and J - J'. Notice how a circle created at this intersection (point L) meets all J's.

Fig. 4. The red lines are bisectors between K'' - K and K' -K. Notice how a circle created at this intersection (point N) meets all K's.

Fig. 5. Grashof's Equation denoting lengths A, B, C, and D.
This next step is absolutely crucial; at some point in the mechanism, all the links line up (they become colinear). This means that there should be enough length in links A and C combined to equal links B and D (see Fig. 5). Any length off means the mechanism can never be colinear, and will not move as desired.
This equation A + C = B + D, or A + C - B = D is called Grashof's Equation (see Fig. 5), and it ensures that a mechanism has full range of motion.
With Grashof's equation satisfied, the system should pivot as expected, and reach the final position. J'' - K''.

Fig. 6. Colinear state.
Fig. 7. Notice how the links all become colinear when they pass through J'-K'.

Fig. 8. All link lengths (A, B, C, and D), and coordinates of points L and N (which create pseudo link D).
Now with the mechanism moving smoothly from start to end position, we have to translate this to 3D CAD using Solidworks. We need these measurements of A, B, C, and the coordinates of points L and N (psuedo Link D) to translate this 4 bar mechanism into Solidworks.
3D CAD (Solidworks):
Trashcan (Link D):
Using the measurements from Math Illustrations, we can construct individual bars to create the mechanism. Firstly, however, we should create a trashcan. All measurements, unless specified, are in centimeters (cm).

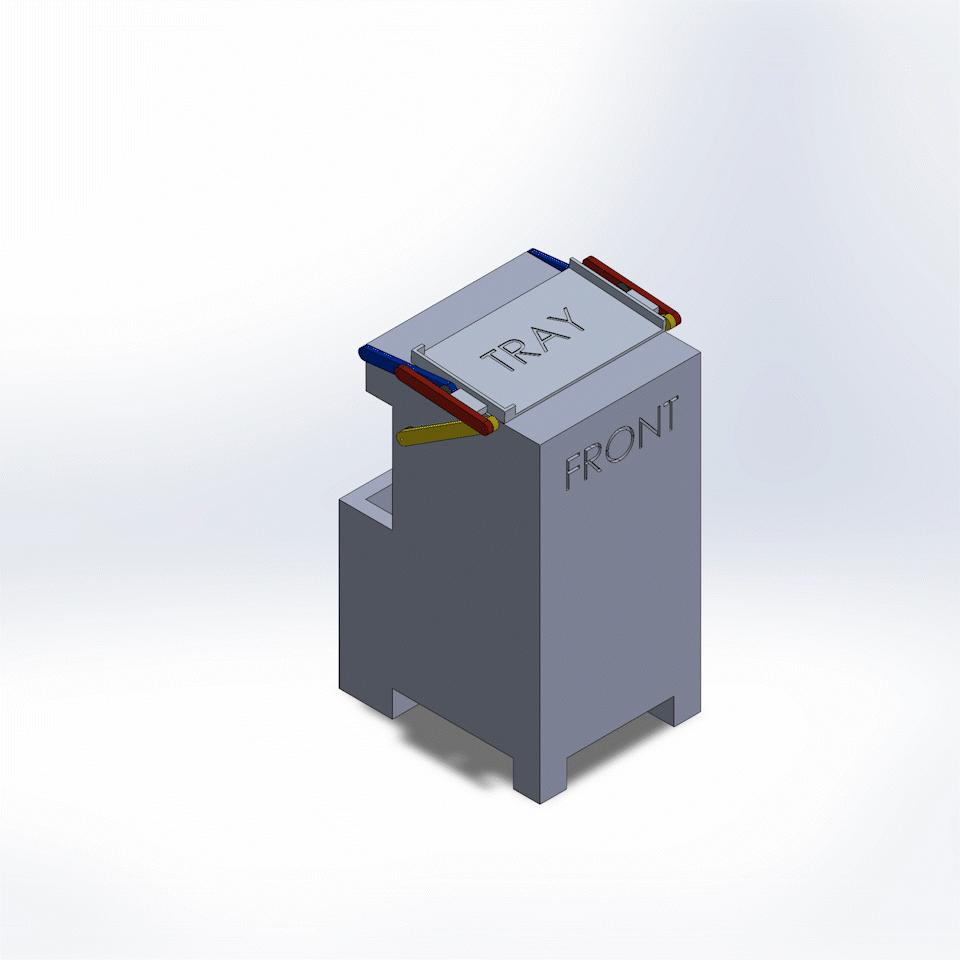
Fig. 9. Fully working Trashcan Mechanism, Side View.

Fig. 10. Isometric View 1.

Fig. 11. Isometric View 2.

Fig. 12. Hole positions correspond to coordinates of "Link D".
Here on the trashcan is psuedo link D, created by points L and N in the 2D drawing, and shown by the holes in Fig. 12. The coordinates of points L and N correspond to the position of these holes. The reference point M in Fig. 8 is the upper left corner of the trashcan in Fig. 12.
I took some slight creative liberties with the trashcan design. The extended back of the trashcan makes the trash fall in better. There is less risk of it sliding down and out of the trash slot because the lower lip should catch any trash that falls straight down.
These cosmetic liberties do not affect the mechanism.
Links A, B, C, and Spacers:
Below are the 3 other links of this 4-bar mechanism. Each link was created with holes exactly the same distance apart as in the 2D drawings (Fig. 8).

Fig. 13. Link A.

Fig. 14. Link B.

Fig. 15. Link C.

Fig. 16. Side View of mechanism.

Fig. 17. Spacer.
The spacers are extremely important because they allow the mechanism to "pass through itself". When the mechanism is colinear, the links all line up and there must be clearance for the links to continue to their final state. There is only one combination of spacer positions that allows the mechanism to work as intended.

Fig. 18. Front View colinear state. Note the position of the spacers in black.

Fig. 19. Side View colinear state.
Tray:
A simple tray was modeled to finalize the design. The wings on the tray are points to interface with link A.

Fig. 20. Isometric View.

Fig. 21. Isometric View 1 in assembly.

Fig. 22. Isometric View 2 in assembly.
Motion Study (Solidworks):
Because of the simple geometry of this mechanism, either links C or B should be able to be moved, and the mechanism should move the same way. This means we can assign a Motion Study motor to either link C or B. In this case I chose link C (yellow).
Fig. 23. Side View Motion Study.
Fig. 24. Isometric to Side View Motion Study.
In this instance, this motion study was more for automation purposes, than to gain data or perform calculations. All that was required was a single motor, set the start and end position of the mechanism, and set some orientation key views. These functions in Solidworks combined to make both Fig. 21 and Fig. 22. These Figures are .gifs that show the motion of the mechanism in the Motion Study, fully assembled.
How To:
The first step to automating this process was to launch Motion Study; there should be a tab at the bottom called Motion Study 1. For the purposes of starting with a clean slate (for peace of mind), I opened a brand new Motion Study (right click the bottom bar and select "Create New Motion Study"), called Motion Study 2.


Fig. 26. Motion Study Motor icon.
Fig. 25. Motion Study Panel.
To enable "Motion Analysis", be sure to add the Solidworks Motion Add-in (Tools > Add-ins > Solidworks Motion). Then select "Motion Analysis" from the drop-down menu circled in blue in Fig. 25. This allows us to graph trace path and evaluate the system if necessary.
To add a motor to the assembly, select the icon circled in Fig. 26. Then assign it to either link C or B. I chose link C (yellow).
Once the motor is added, move the topmost slider (across from "testassem2") to any time. This sets how long the simulation runs.
At this point the system is ready to run. Click the Graph with a Gear icon to the right of "Motion Analysis" circled in blue.
If you want, you can play with Key Views and Orientations to make the camera move during the simulation (see Fig. 24).
Improvements:
The main improvement I had in mind was creating a slide-pin joint, instead of a pin joint for the interface between Links A and B, and A and C. During the colinear state, with a fully constrained pin joint, the tolerances are so close that the mechanism might see some tight tolerances and experiences unwanted stress. In a real scenario, this would either break the mechanism, or get stuck and burn the motor. With a slider joint, the tolerances are relieved by not being constrained as much.

Fig. 23. Example of Link C with slider-pin joint. This end of Link C interfaces with Link A (not with the trashcan, AKA Link D).
An alternative to this slider joint would be a hydraulic arm that extends when necessary, or a telescoping arm that also extends when necessary. Instead of placing stress on the pin joint when things get tight, it would just extend and there would be no stress.
Takeaways:
Overall, this project was challenging simply because it took a couple iterations to get make sure Grashof's equation was satisfied. Even when it was satisfied, the tolerances were so close, that Solidworks would stop the simulation. My first iteration kept failing during the Motion Study, so I scrapped it all and restarted from 2D. The second time around the simulation worked well and it what is published in this portfolio above.
This exercise with mechanisms has opened a new way of thinking for me. We see them in plenty of mechanisms in our everyday lives, but I have had yet to evaluate the geometry of them to see how they work, until now. Mechanisms are an extremely rudimentary, but important method of design because they are the least expensive form of design: a good mechanism should use rigid links, which are easy to manufacture and have no moving parts.
This assignment, combined with exercise #4, made me extremely familiar with Solidworks Motion Studies and helped me learn the quirks of how Solidworks simulations "think" and how to work around some errors seen in Solidworks.